
Have you seen a summary page within Confluence that looks like decision log below and thought “I wish I were able to create a similar summary page for my custom built pages?” Well, you can, it’s easy and once you have mastered the workflow, no doubt you’ll be sure to impress your colleagues.

In this tutorial, we are going to create a programme summary overview for all projects within a programme of work. Here is what the final result will look like.

Fundamentally, this workflow hinges off two key macros and a unique label to link them. The two macros we’ll need are.
- Page properties macro
- Page properties report macro
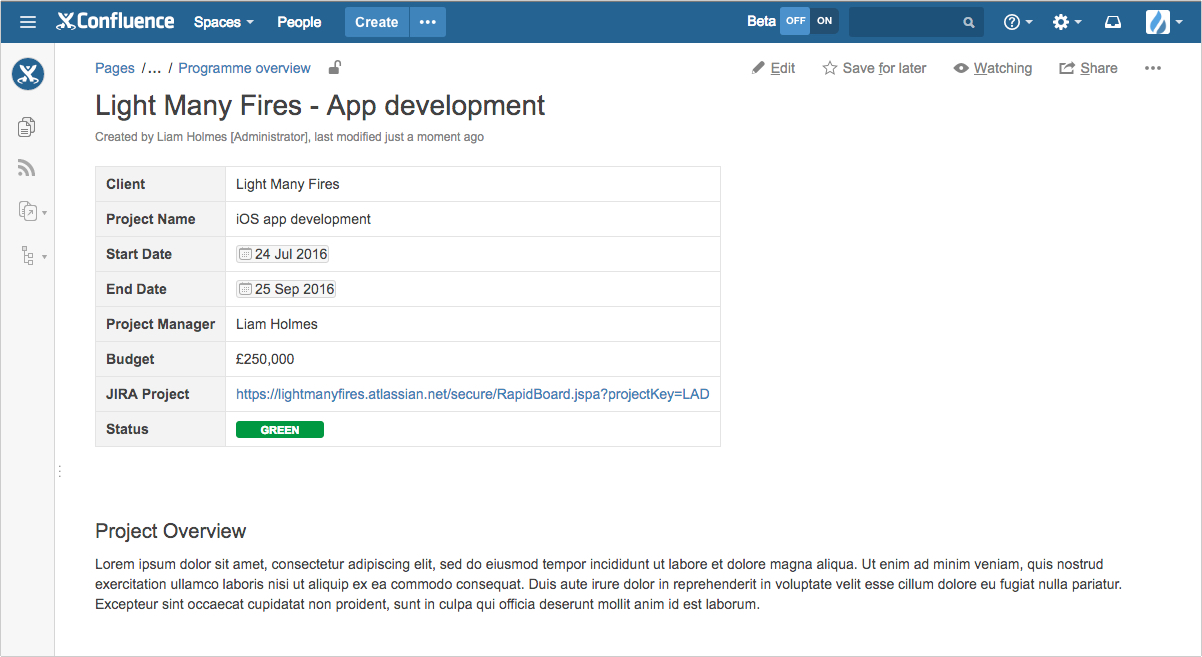
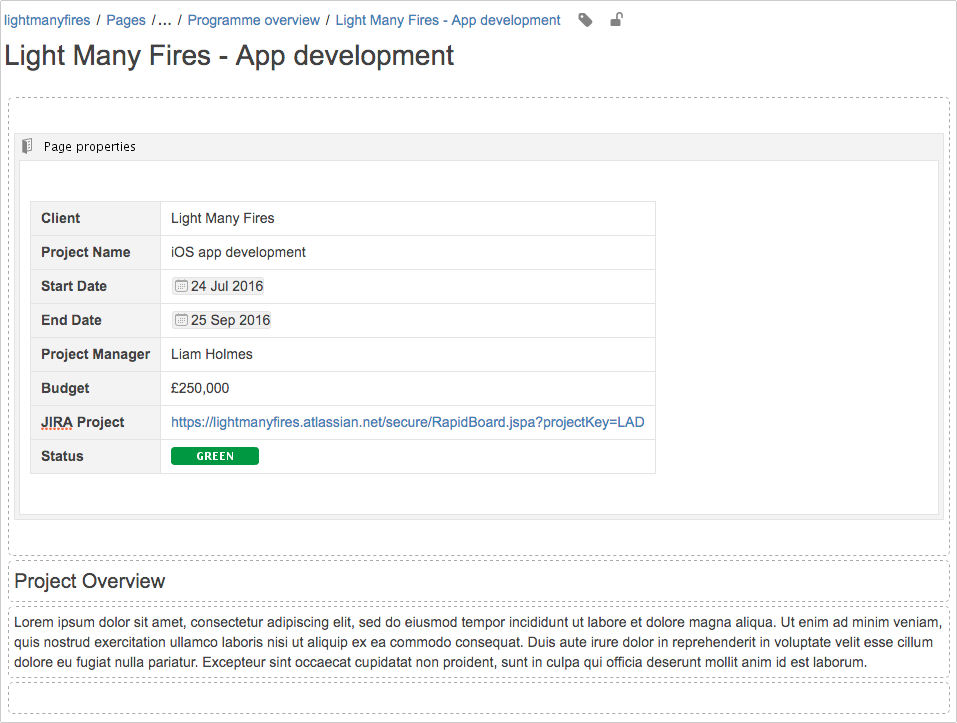
From a high-level point of view, the way this setup works is, let’s say you have a templated page, something that you create over and over, such as a ‘project page’ i.e. a page that is created for each new project in your organisation. And let’s say for each of these project pages you have a table documenting the same data attributes, such as job code, budget, project status, etc. Here is an example.
What we’ll do is,
- Wrap the common table in the project pages with the page properties macro.
- Give the project pages a unique label.
- Add the page properties report macro to another page, where we want to surface the information. We are calling this page the ‘summary page’.
The page properties report macro will then target all pages that have the specific label, who also has a page properties macro that contains a table. If those criteria are met, the table attributes will be surfaced on the summary page.
First up, we need to wrap the project info table in the page properties macro.
While on our project page, go into edit mode and from the macros dropdown in the rich text editor select ‘Other macros’.
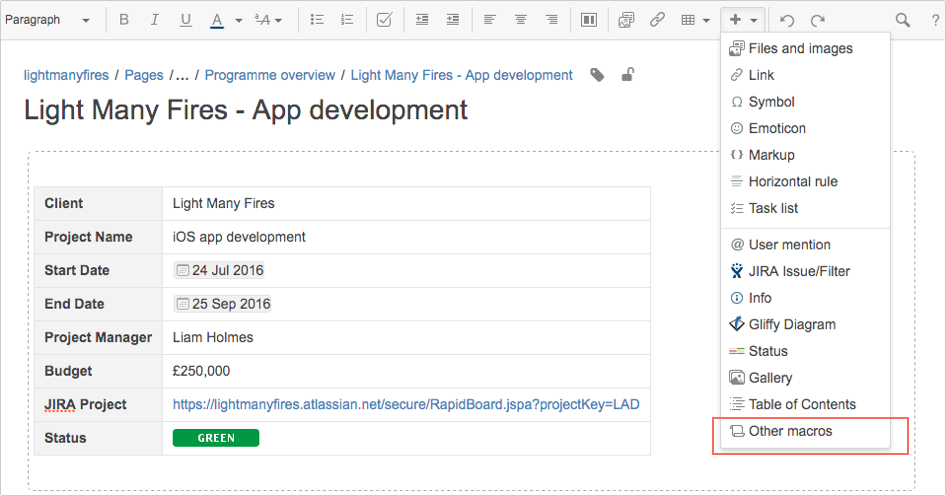
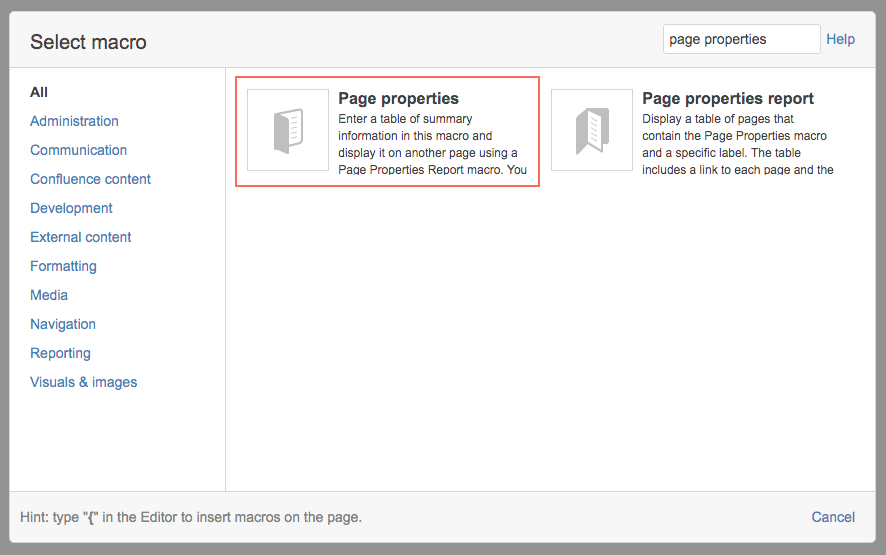
From the macro’s dialogue modal, search on ‘page properties’, the following two macros will be returned. Select the page properties macro.
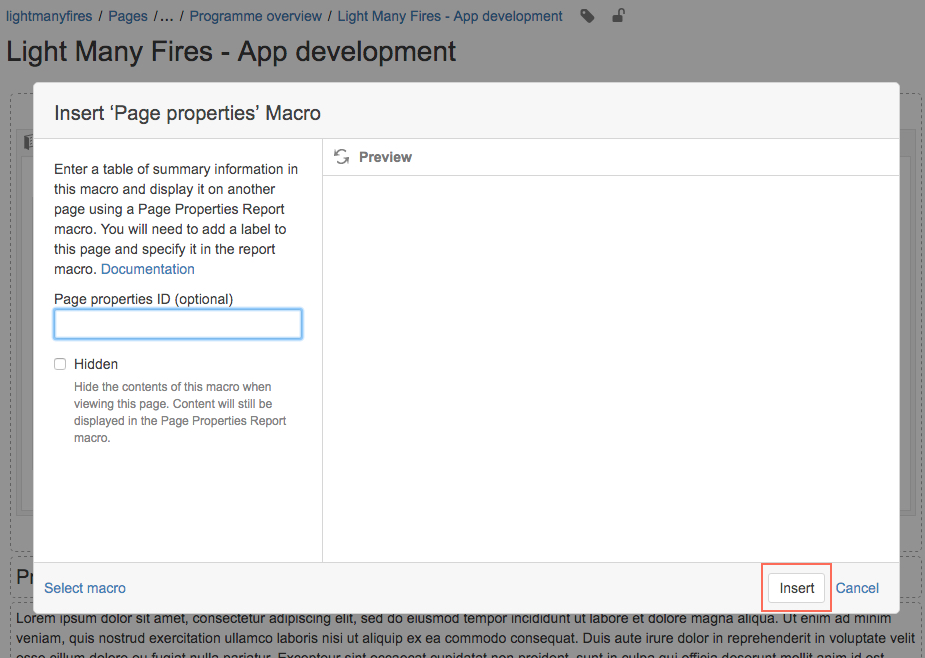
From the following modal screen hit ‘insert’
Once you have added the macro to your page, copy and paste the existing table into the body of the page properties macro. While still in edit mode you should see something that looks like the image below.
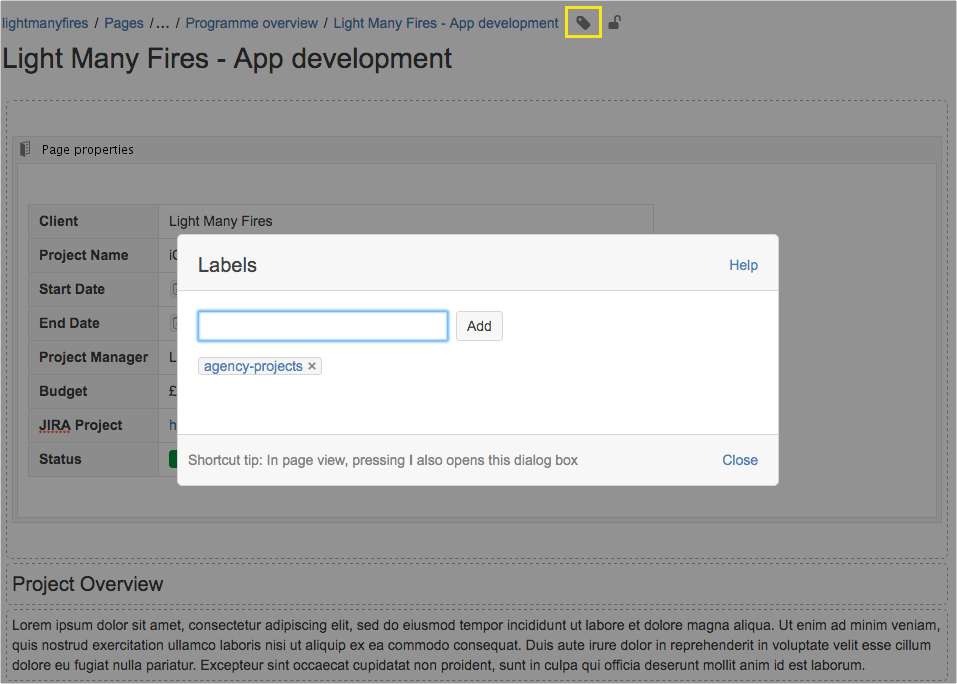
Now that we have wrapped our table in the page properties macro, we need to add a unique label to this page. This label will be used as the “hook” that connects the project pages to the page properties report macro. This label will be used for all current and future project pages where we wish to surface information onto the summary page. In this instance, we’ll create and use the label ‘agency-projects’.
Click the tag/label icon as highlighted in yellow below, add the label and save the page.
That’s us done for the project page, now let’s move onto the summary page.
First up, let’s create a page called “Programme overview” this will be the page where we’ll surface the information from each of the tables in the project pages. Once you have created the programme overview page add the “page properties report” macro. This is done in the same way that we added the “page properties macro” to the project page.

What does this macro do?
The page properties report macro will look for all pages with a specified label, in this case ‘agency-projects.’ Once it finds a page with the designated label, It will then look to see if that page has a page properties macro on it, if so, does it have a table within it? if so, it will then surface those table attributes on the summary page that houses the page properties report macro. If the pages that you’re trying to pull in doesn’t have a page properties macro wrapped around the table or the page doesn’t have the correct label, the page’s details will not be surfaced on the summary page.
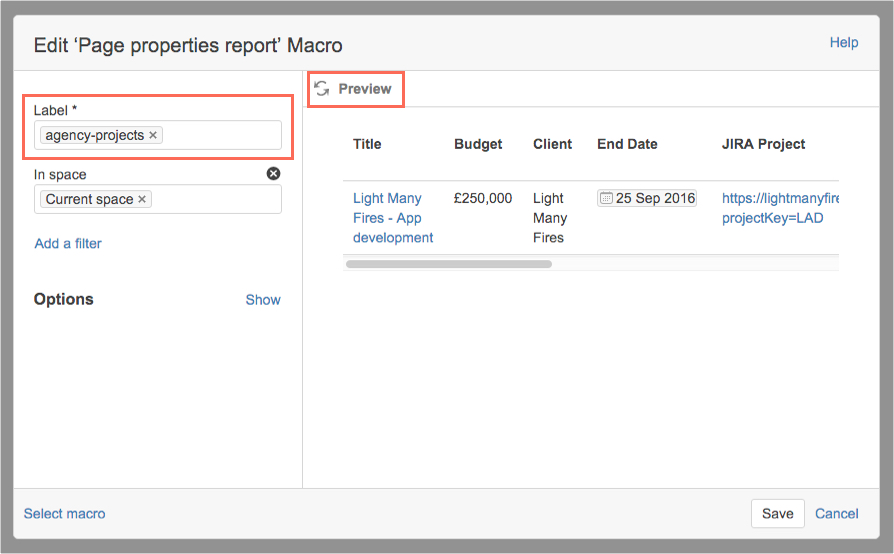
Once you have added the macro to the summary page you will be presented with a dialogue modal as seen in the image below.
Firstly we’ll enter the label that we are using on our project pages, namely ‘agency-projects’.
In this example, we are pulling in pages within the same space as the summary page. However, you can pull in page information from other spaces. If you’re in this position, enter in the additional spaces that you’d like to pull information from, then click the ‘preview’ button. You should now see the information being surfaced in the preview area.
If you don’t see the page information being displayed as seen in the image below, firstly make sure that your page table is wrapped by the page properties macro. Secondly, ensure that the page in question has the same label that is being targeted by the page properties report macro. Once the page information is being displayed in the preview area, hit save on on this dialogue modal and then save your page.
Now you should start seeing your pages table attributes being surfaced on the summary page.

Ok great, everything is working! However, when you have this much information being displayed it can clutter your page. Furthermore, some information just may not be relevant to be shown at this level. For example, on this summary page, we may not care what the start date of the project is, or what the link is to the JIRA project. So let’s clean this up.
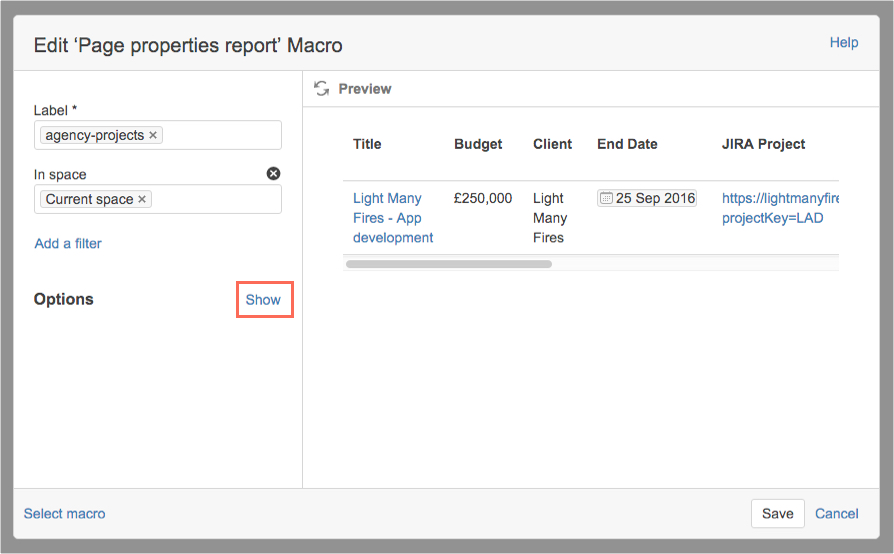
On your Summary page, go back into edit mode and double click on the macro to display the modal dialogue. We’re gong to click on the “Show” link next to the ‘Options’ header to display further options.
In this example, we want to show the following attributes ‘Client, Project Name, Budget, End Date, Project Manager, Status.’
Scroll down to the “Columns to show” text entry field and add in the column names that you wish to show. Multiple column names need to be separated by a comma.
Note: The ‘Title’ field, which is the name of the page will always be shown.
Also, when entering the column titles into the text entry box, the text is case sensitive. Furthermore, the order in which you place them into the text box will determine the order in which they’re shown on the summary page.
If you make an error and you can no longer see all the columns in the preview window, simply clear out the text entry box and hit preview. This will bring back all the column names in the preview area.
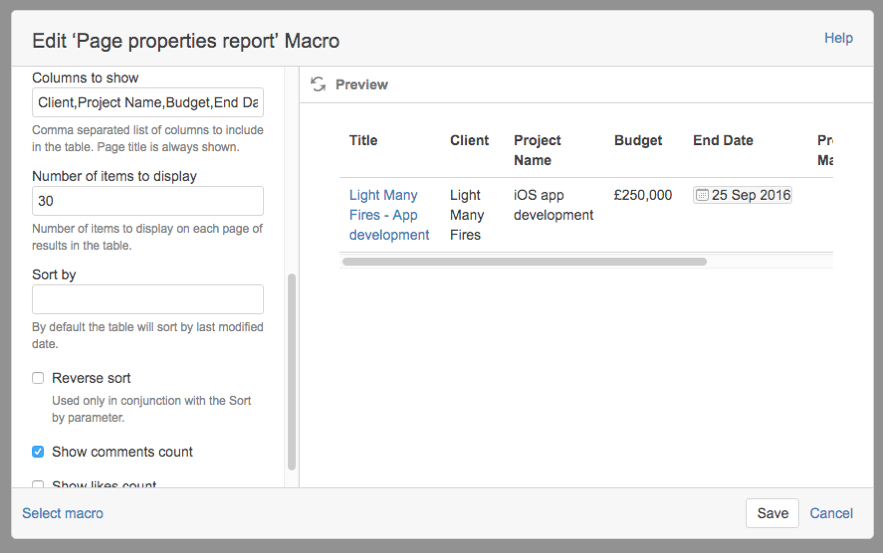
Once all the desired columns are being displayed in the preview window, hit save on the modal dialogue, then save your page.
You will now be presented with a refined version of the summary that we had earlier.

And that’s it! Now we’ll create the other project pages, wrap the respective project tables in the page properties macro and give the page the appropriate label. Those pages will then be surfaced in the summary page, giving us the following result.
In a future tutorial, we’ll go through the process of creating a blueprint for your templated page. This custom blueprint will not only give you your desired page layout but will also have the page properties macro and required label baked into the blueprint. Going forward all you’ll have to do is create a new page from that blueprint and you’re good to go, no worrying about adding macros, tables or labels.
I hope that this post was helpful, please leave any comments or thoughts in the comments section below.